
I recently designed a 3D printable “fabric” that can be flexed in almost any direction. To do it, I had to work around how 3D printers function and apply some math tricks to create ideal geometry for the fabric.
The Idea
I got the idea for a printable fabric by hand-making chainmail in the past (I realize I’m not the first to print fabric, but I did design my own, so there’s that). The process for making your own chainmail from scratch involves winding a wire around a mandrill to form rings, and then weaving the rings to each of its neighbors to form a flexible mesh of steel rings. Once all the rings are connected, you can simply close the ring with a pair of plyers (historically these may have been forged together, but that’s too much work). With enough rings, they end up forming a fabric and can flex pretty much like normal textiles.
I realized that we can use 3D printers printing each ring layer by layer to simulate “weaving” the rings. Put another way, the rings are not continuous while they’re being printed, so we don’t have to bend or “close” them once they’re formed. Once the last layer is applied by the printer, the ring is whole. This means they can be printed in place without loss of structural integrity.
About Overhangs
When designing anything for FDM 3D printing, you must always be conscious of overhangs. Additive manufacturing in general does not like overhangs because the layer that’s currently being printed depends on the layer below it to stick to and support it. If it’s not there, hot filament is extruded into free space and goes wherever it likes, forming spaghetti-like structures. This is very cool if you’re into abstract art, and very not cool if you like structural integrity in functional prints. You can get around this limitation by printing external supports under overhangs – sacrificial structures that are simply there to support the overhang but otherwise will be detached and discarded when complete.
Another thing to note: while FDM 3D printers typically don’t perform well when print overhangs, they can handle it a little bit. Normally this is somewhere in the range of 40 - 50° of tolerance in relation to the perpendicular. So if you have a horizontal part, for instance, that’s not great as there’s nothing to support it. But if the layer below it is offset by 45° or so, there’s a part of the previous layer that can support the next one, and the printer proceeds mostly as normal. There might be a little bit of loss of quality, but at least not outright failure.
With that in mind, the fundamental problem to designing a 3D printable fabric is how to design a linkage that can overlap (overhang) another part that doesn’t require supports.
A Little Math
To start with a “simple” example, let’s look at the first 2 rows of chainmail. In its most basic form, chainmail is a row of evenly spaced rings woven into a second row of rings.
How might we print that in a 3D printer?
Well, the easiest way is to simply print 2 rows of rings offset by 90° to one another. This has a really cool advantage: this number is divisible by 45°, and the result is the same as the number of parts! So we can offset the first row by 45° with respect to the print bed, which allows both parts to touch the bed but not each other and the print won’t require supports.
That’s a lot of words, so here’s a graphic. The alignment here is correct – that’s just to fit the next row of rings into the first:
Rings typically do have overhang angles larger than 45°, and this is no exception. Note at the bottom of each ring there is a portion that is almost horizontal – so this incurs a tolerance penalty when printing. Similarly, the part of the ring touching the print bed must also necessarily be flat in order to have good bed adhesion. If it didn’t, it would run into the spaghetti filament problem above.
We could add a flat base to the ring to solve that problem, although it would mean the segments are now stuck in a certain orientation and can’t rotate about the central axis of the torus. Not a huge problem, and it still produces a cool result.
Before, we were working with 90° angles with respect to the horizontal and vertical neighbors. We’ll still need to respect that angle for horizontal neighbors but we could add an arbitrary number of neighbors. Good candidates for that number will be small factors of 360 (3, 4, 6, 12, etc.). This makes the math easy as we aren’t dealing with fractional angles, and large factors of 360 mean that we’ll get crowded quickly and so can’t design a fabric as flexible as possible.
The first step is to create the individual unit in our fabric. This will have a flat base with N number of sides where N is the aforementioned small factor of 360. In this case, I used 6 as hexagons are convenient to work with. We can simply create a rotational pattern of rings about the central axis of the part:
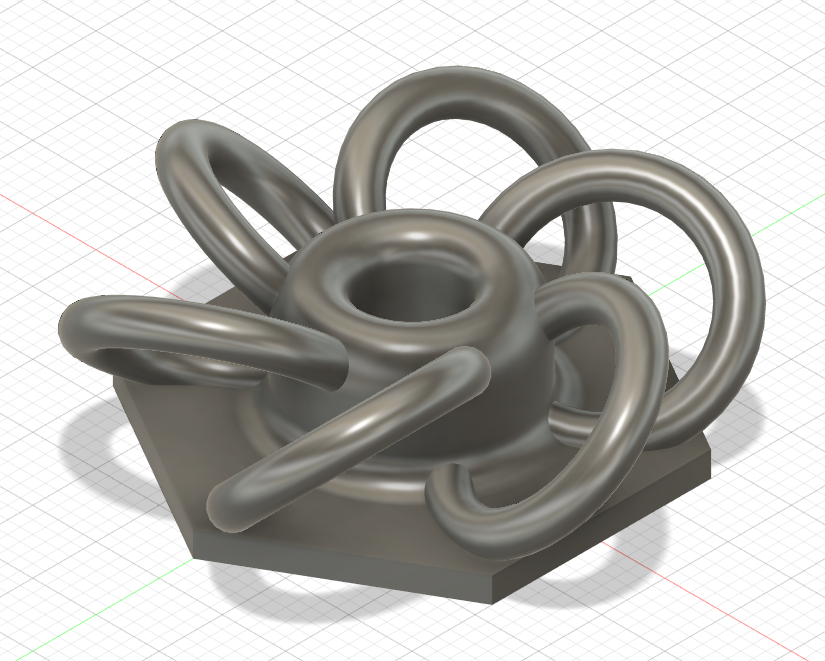
This step is EXACTLY like the chainmail example, but repeated 6 times, once every 60° (since 6 * 60° = 360°).
The next step is to take these units, space them apart, and then repeat the pattern 6 times, again once every 60°. Here’s what the first of those neighbors will look like:
And if you extract that out, you can now repeat this circular pattern as long as you like:
Wrap Up
All in all, it was a really cool project to design. I’m not a mechanical engineer but I loved working out the ins and outs of making a 3D printable fabric. It’s incredible to feel in the hand and the print came out great.
If you’re interested in printing your own, you can download the STL here.
Note: I didn’t design this one, but it’s a similar idea.
That’s all for now. Thanks for reading!