
Today we’ll be walking through how to build a Raspberry Pi-powered LED scoreboard for your favorite sport. In most cases, the software you’ll need to install and run has already been developed, so it’s simply a matter of setting up your hardware and following installation directions. In other cases, you might find that suitable scoreboard software doesn’t yet exist, so I’ll talk a little about how to start developing for other sports as well.
If you don’t want to buy the hardware required to run this kind of software on an RPI, you can also emulate most of these on a desktop PC as well with an emulator I wrote called RGBMatrixEmulator. Skip ahead to the section on Emulation for details on how this works.
Once you’ve tackled everything here, you’ll also be set up to display all kinds of things on your LED matrix, not just sports!
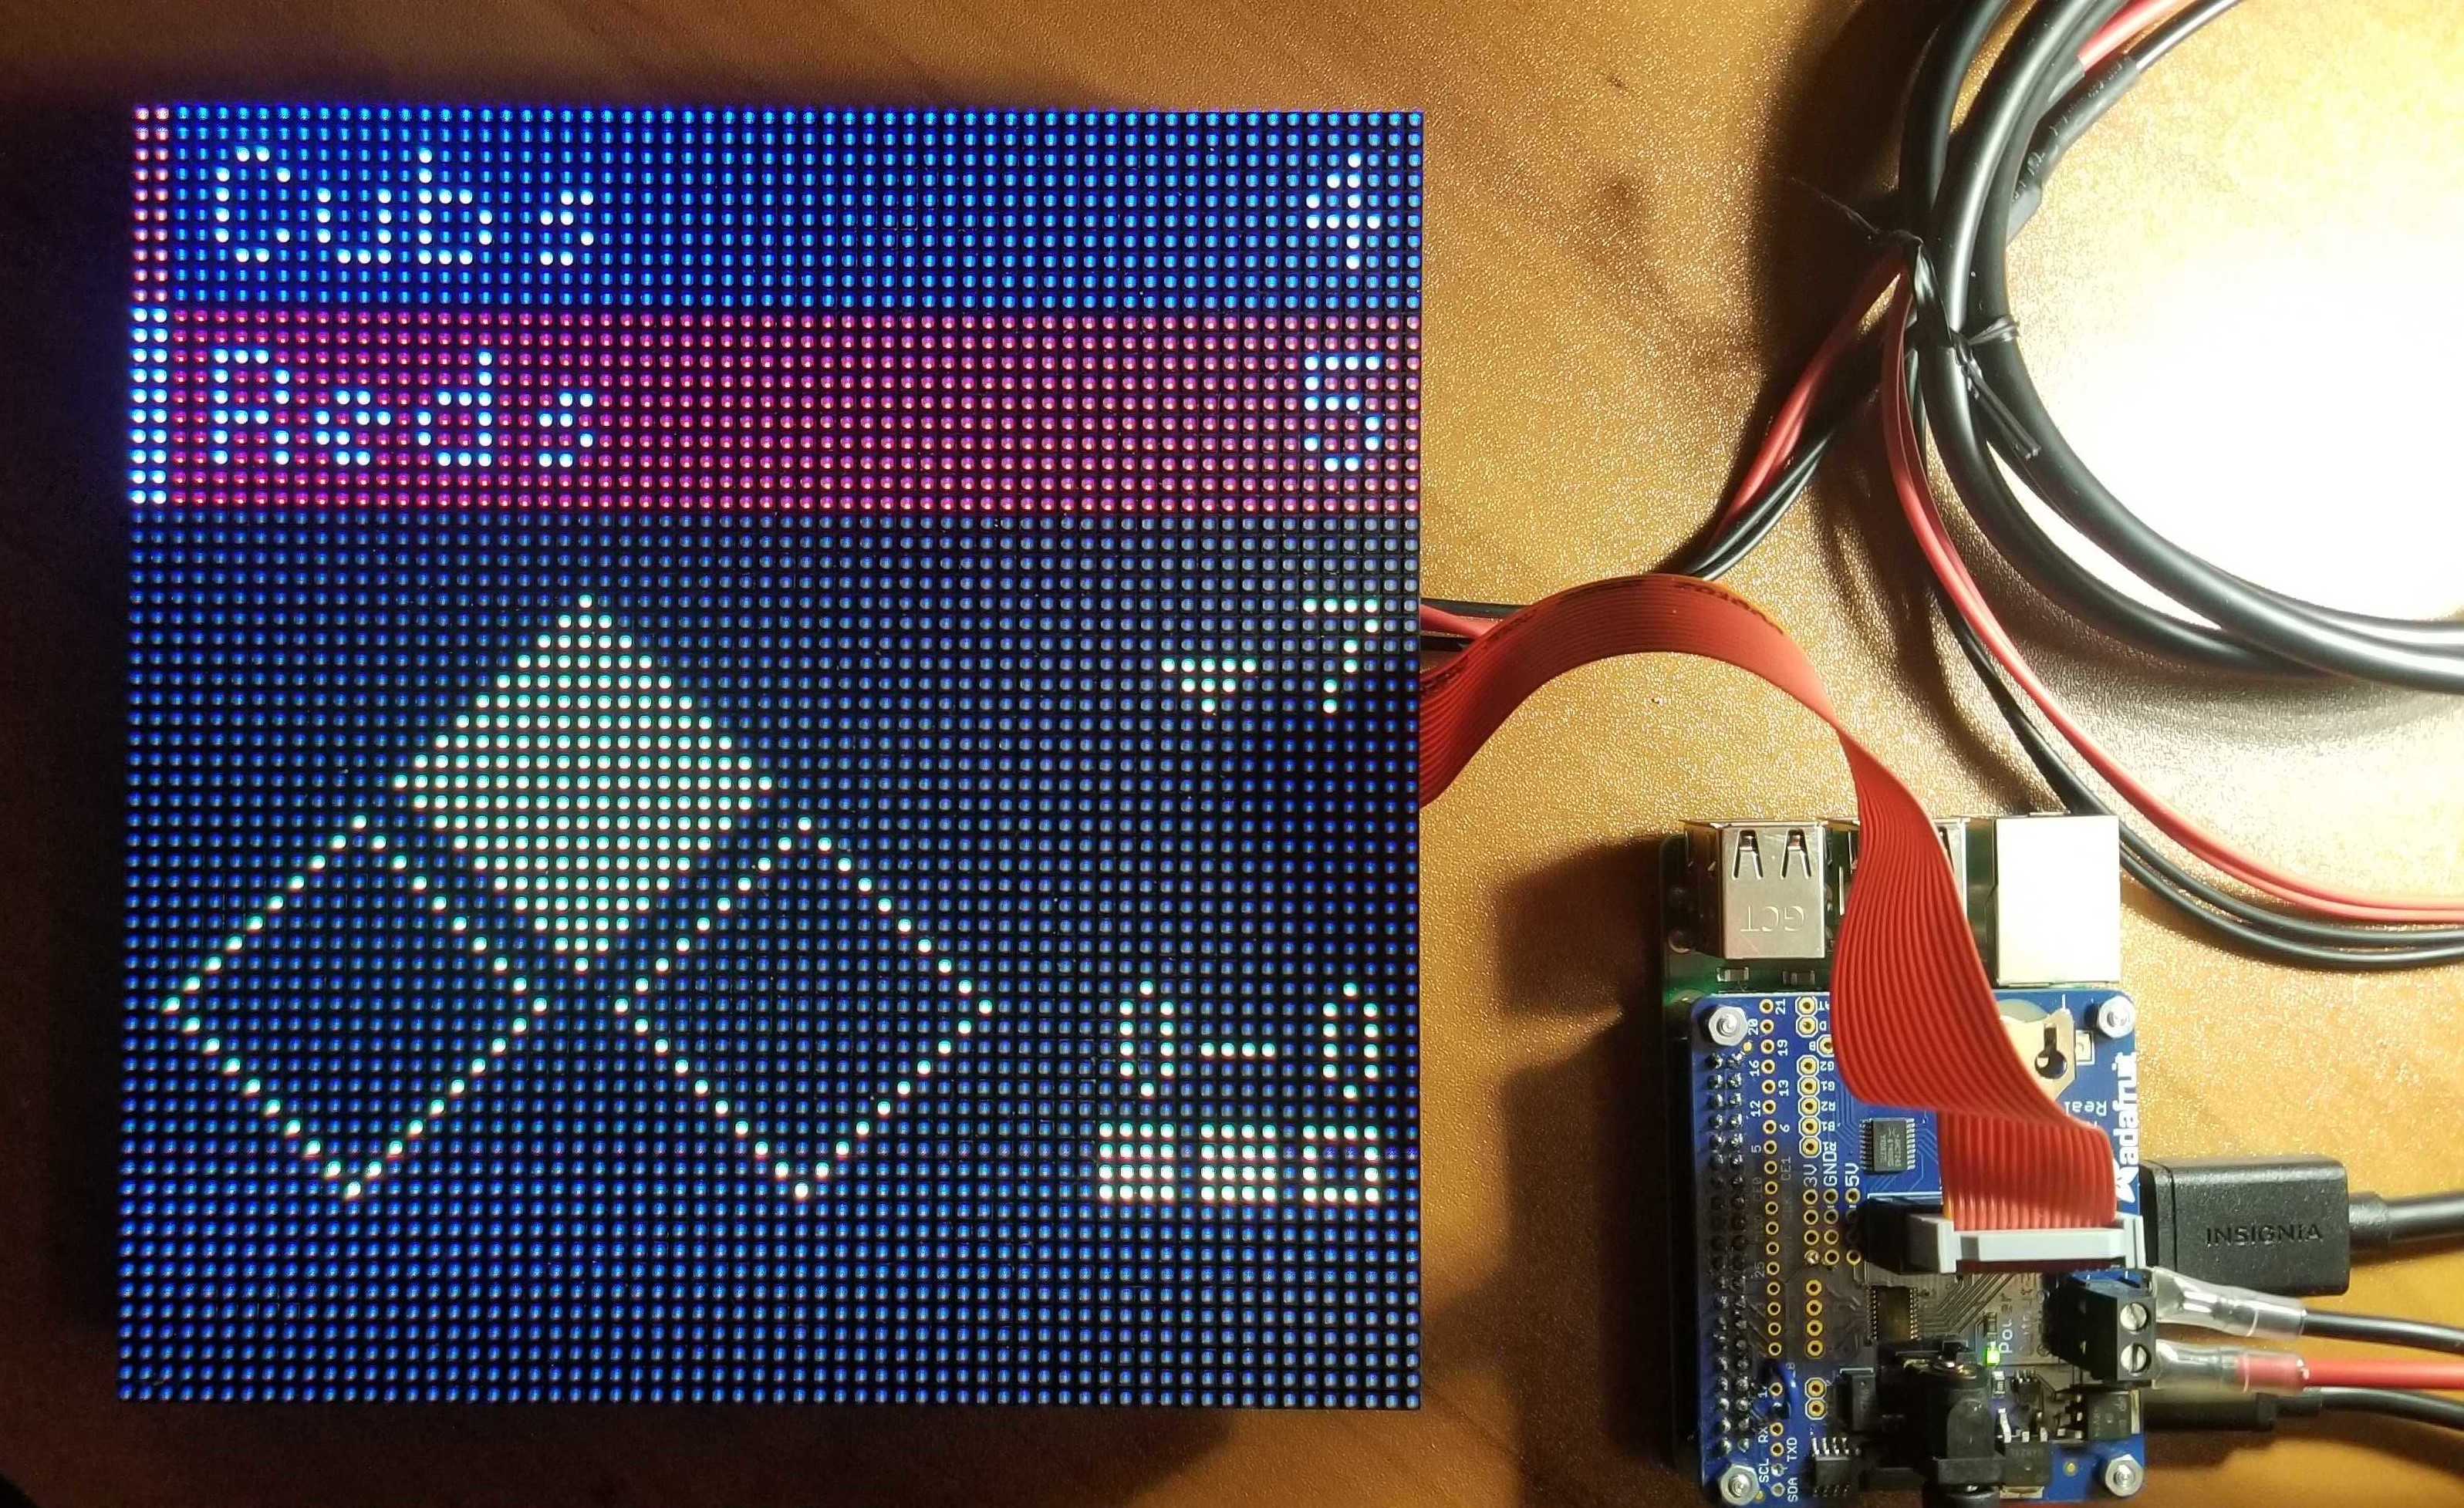 My MLB scoreboard in action on the mlb-led-scoreboard repo.
Publicly Available Scoreboard Software
Below is a (non-exhaustive) list of scoreboard software designed around RPI-powered LED matrices. You’ll typically run only one of these at a time. There is a method to rotate each of the sports independently but is outside the scope of this guide.
You’ll notice these are all named similarly – this is no coincidence. The mlb-led-scoreboard project was first and inspired many of the others. As such, the installation steps of each of these will be similar, but not necessarily the same for each project. When in doubt, refer to the README of the software you’re installing.
Special shout out to rpi-led-nhl-scoreboard as well. This one is not based on the other projects (from what I can tell) and is the newest of the bunch. This project features real-time score updates for NHL.
Things You’ll Need
- Raspberry Pi
- This can really be any model you want. Some things you’ll want to keep in mind:
- Raspberry Pi needs an internet connection – you’ll want to make sure if you get a Pi Zero that it’s the W version (for Wi-Fi)
- On the Pi Zero – They are generally underpowered for this type of work. They work, with caveats.
- There may be minor additional work to get newer Pis to work with the LED driver software.
- Recommended: Raspberry Pi 3B+
- This can really be any model you want. Some things you’ll want to keep in mind:
- RGB HAT or Adafruit Bonnet
- The HAT requires soldering lots of small parts including pin headers, power connections, etc.
- The Bonnet is basically plug-n-play.
- Recommended: Adafruit RGB Bonnet
- LED Matrix
- You’ll need one that is HUB75 compatible.
- The most basic size is 32x32. Some scoreboard software supports other sizes (in some cases up to 128x64).
- Anything over 64x64 requires minor soldering to both the HAT or Bonnet above, so keep this in mind!
- Recommended: 64x32 RGB Matrix (unless your software does not support it, then get the size you need!)
- Power adapters
- You’ll only need one in most cases, but bear in mind the LED matrix draws a lot of power. For larger matrices, you’ll want to power both the Pi and matrix separately.
- Check Adafruit’s guide to selecting a power adapter:
A 5V power supply is also required, not included, for powering the matrix itself.
The Pi cannot do it due to the high currents. To calculate the max current of your matrix set up, multiply the width of all the chained matrix by 0.12 : A 32 pixel wide matrix needs 32*0.12 = 3.85A so pick up a 5V 4A power supply.
- Check Adafruit’s guide to selecting a power adapter:
- Recommended: Whatever suits your power requirements (I use a 10A supply to power a RPI 3B+ and 64x64 matrix at the same time)
- You’ll only need one in most cases, but bear in mind the LED matrix draws a lot of power. For larger matrices, you’ll want to power both the Pi and matrix separately.
These are the only specialty parts you’ll need in order to set up your scoreboard. Some other things you’ll also need, but either probably have laying around or can get later:
- MicroSD card
- New Raspberry Pis usually come with this anyway
- Mouse/Keyboard
- Monitor
- HDMI cables
- Check that you have any adapters you might need, such as Mini HDMI on Raspberry Pi Zero
Assembly
Hardware assembly should be fairly straightforward. The guide from Adafruit gives plenty of detail on what should be plugged where.
If you’ve chosen a setup that requires soldering. In that case, refer to this guide for proper soldering technique. If you can, it helps to practice a bit and ensure you have a steady hand before you dump a bunch of heat into sensitive electrical components.
There’s two cases where you’ll need to solder:
- You’re using the RGB HAT and need to solder headers, power terminals, etc.
- You have a matrix that’s 64x64 or larger (regardless of using the HAT or Bonnet)
For matrices 64x64 and larger, you’ll need to solder a jumper on the E address line:


Next, you’ll want to decide if you want to sacrifice a little compatibility for better performance. You can optionally solder a jumper between pins 4 and 18. Doing this will make the board run faster (i.e. less flicker), but you sacrifice the ability to use the sound driver on your Pi. I recommend doing this, as this project is really just going to sit quietly on a shelf and doesn’t need any audio output.
Once this is complete, it’s time to work on…
Software Installation
rpi-rgb-led-matrix
Under the hood, all of the scoreboards listed above use a driver library called rpi-rgb-led-matrix. When using this, it’s important to note that you’ll have to run all your commands prepended by sudo. You’ll be prompted to enter a password the first time you do this.
Because it’s run under sudo, Python uses the system dependencies at runtime – this is why getting multiple scoreboards working together is quite difficult, because there’s really no way to make sure all the versions of dependencies are compatible across scoreboards.
Even worse, these projects have multiple ways of installing the driver, causing further complication.
My advice – for present and future compatibility – is to stick to one type of scoreboard at a time. If you want to have a swappable setup, a great way to separate them is to get multiple SD cards and install different board software to each. Then, when you’re ready to swap sports, you can simply swap SD cards!
Installing Specific Scoreboard Software
At this point, when in doubt, refer to the README of the software you’re installing.
We’ll do a sample installation of the mlb-led-scoreboard repository. Let’s start by cloning the code from GitHub and running the installer. Remember, this step is just a sample, so if you ‘re installing a different scoreboard, you’ll want to refer to the clone/installation steps for that scoreboard instead!
In a terminal:
git clone --recursive https://github.com/MLB-LED-Scoreboard/mlb-led-scoreboard
cd mlb-led-scoreboard/
sudo ./install.sh
This will install the rpi-rgb-led-matrix driver and any required dependencies to get the board up and running. If there’s any additional configuration you need to do, you’ll want to follow the prompts. If you’ve soldered pin 4 and 18 on your HAT/Bonnet, make sure when you install the driver you select the Quality option when prompted.
During installation, you might also need to configure the scoreboard you’re using. The MLB scoreboard, for instance, will ask if you’d like to create and configure the config.json file it uses. You’ll want to select “yes” on your first installation to generate this file. If you want to customize your scoreboard, it’s best to refer to the scoreboard’s README or GitHub wiki page in order to get specific customization instructions.
Running the Scoreboard
With any luck, you’re now ready to go!
The command to start your board is very simple:
sudo python main.py --led-gpio-mapping="adafruit-hat"
If you do this from the scoreboard directory, you should get some output on your matrix!
Note, this command assumes you’re using the default setup (a 32x32 matrix, RGB color order, a Raspberry Pi 3B+, etc), so it might not look “correct”. Not to worry! You can customize how the scoreboard runs with the following additions to your startup command:
Different Matrix Size
Add --led-cols=MATRIX_WIDTH or --led-rows=MATRIX_HEIGHT depending on your matrix size. For a 128x64 matrix, add:
--led-cols=128 --led-rows=64
Different Raspberry Pi Model
You can slow down the GPIO output from 0 to 4 (it defaults to 1):
--led-slowdown-gpio=4
You may need to play with this one to determine which one works best. You typically need to slow it down for Pi 4 models, and speed it up (i.e. 0) for Zero models.
Brightness
Sets the brightness to the given percentage:
--led-brightness=50
Other Things
Be sure to refer to rpi-rgb-led-matrix for additional options like matrix chaining and other cool stuff that’s outside the scope of this writeup.
Emulation
What if you don’t want to buy $150 worth of hardware in order to get a scoreboard set up? Well, I’ve worked on converting a few of the scoreboards to work on a desktop PC.
You’ll follow very similar steps to installing the emulated versions of these scoreboards. MLB’s version, for instance:
git clone git@github.com:ty-porter/mlb-led-scoreboard-emulated.git
Depending on your operating system, you’ll run the installer one of two ways:
# Windows
./install.sh

# Mac/Linux
sh ./install.sh
And finally, running the emulated versions of these scoreboards does NOT require the use of sudo. Simply alter the startup command to omit it. All the other command line flags are emulated – this is a great way to see how things work on different matrix sizes!
python main.py --led-cols=128 --led-rows=64
(Note you can also omit the --led-gpio-mapping="adafruit-hat", as it’s not needed.)

On setup, there’s an additional emulator_config.json file that is generated to customize the output of your emulator. You can edit the pixel size and shape within it.
Writing Your Own
Don’t see a scoreboard for the sport you’re looking for? Don’t want a scoreboard at all? Don’t worry! It’s not as daunting as you think.
As mentioned before, the LED driver library is rpi-rgb-led-matrix and it provides helpful functions to draw text and graphics to the screen. Let’s take a look at a short example of how a simple Hello World! message might be drawn to the matrix.
Using samplebase.py
Within the driver library, there are some Python samples. We’re going to lift the samplebase.py file straight out of those examples because it adds our argument parsing that we’ll need to support multiple matrix sizes.
You can find that file here. Note that you’ll need to change any rgbmatrix imports to RGBMatrixEmulator for the purposes of this example, if you’re choosing to emulate this.
(If you’re customizing a scoreboard that you already have, the boilerplate code in this file is likely already done for you. It’s most common to follow what mlb-led-scoreboard has already completed, so you’ll mainly be touching rendering code in scoreboards based on that project.)
Drawing to the Screen
Next, let’s create a file hello_world.py. This is a simplification of runtext.py which can be found here.
#!/usr/bin/env python
# Display hello world with double-buffering.
from samplebase import SampleBase
from RGBMatrixEmulator import graphics # Note that we're emulating this! You can use the regular Pi calls with the following line.
# from rgbmatrix import graphics
import time


class HelloWorld(SampleBase):
    def __init__(self, *args, **kwargs):
        super(HelloWorld, self).__init__(*args, **kwargs)

    def run(self):
        # Startup code

        # We always create a canvas to use with the matrix.
        offscreen_canvas = self.matrix.CreateFrameCanvas()

        # Font loading
        font             = graphics.Font()
        font.LoadFont("../../../fonts/7x13.bdf")

        # Setting a YELLOW color
        textColor        = graphics.Color(255, 255, 0)

        # Starting position is the canvas width (i.e. we'll scroll right to left)
        pos              = offscreen_canvas.width

        # Text to scroll
        text             = "Hello World!"

        # Usually you want to operate in a loop, graphics must be drawn to the matrix continuously.
        while True:
            # Clear the canvas
            offscreen_canvas.Clear()

            # Call graphics.DrawText to put the text into the display buffer. It's not drawn anywhere yet!
            # NOTE: graphics.DrawText returns the length of the text as an integer.
            len = graphics.DrawText(offscreen_canvas, font, pos, 10, textColor, text)

            # Scroll
            pos -= 1

            # Handle the wraparound condition
            if (pos + len < 0):
                pos = offscreen_canvas.width

            # Sleep for 50 ms
            time.sleep(0.05)

            # matrix.SwapOnVSync paints the display buffer to the LEDs!
            offscreen_canvas = self.matrix.SwapOnVSync(offscreen_canvas)


# Main function, here's our entry point.
if __name__ == "__main__":
    hello_world = HelloWorld()
    if (not hello_world.process()):
        hello_world.print_help()
And to run all this:
python hello_world.py

Wrap Up
I really enjoy working on scoreboards. They’re such a cool project and get a great reaction from friends and family. It’s fun to learn new skills and build these things with your hands, but of course it can be daunting.
This guide, while it’s definitely not the most comprehensive (there’s so much information out there specifically around just getting scoreboard software up and running, that’s a daunting task!), I hope you have enjoyed reading along and are encouraged to go out and build your own.
Resources
If you choose to tackle this project, there are communities out there to get you set up for each of these scoreboards.
The mlb-led-scoreboard maintains a Slack channel (that I’m very active in) if you need support. The nhl-led-scoreboard maintains a Discord server as well.
You can also reach out on the brand new Raspberry Pi LED Matrix Slack channel for overarching support on these scoreboards, hardware assembly, and custom development using rpi-rgb-led-matrix.
That’s all for now. Thanks for reading!