
Most people are very familiar with at least one, if not two, of the main forms of rendering graphics on computer displays – raster and vector graphics. Today, I’d like to talk about a 3rd (technically a subset of vector graphics) for which I developed a display adapter for my RGBMatrixEmulator library.
A full read of the purpose of RGBMatrixEmulator can be found here and a guide for building your own displays and custom scripts can be found here.
Raster Graphics
Raster graphics are what almost all computer displays are based on nowadays – they are more commonly referred to as pixel graphics. Raster comes from the Latin rastrum meaning “to rake”. This is important to understand because the electron gun in older TVs and computer displays moved in a specific pattern and “raked” across the screen from left to right, top to bottom. By doing this, it forms a grid, of which each cell is a rectangular (!) pixel. Usually each pixel is square, but not always!
To draw to the display, the computer just needs to tell the electron gun when to turn on, and depending on where it is, that pixel will light up. Adding color data to this simple example is easy and follows much the same process.
A good example of raster graphics is of course Mario:
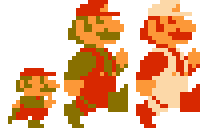
Mario’s visage in this case is a sprite, and the game needs to store a lot of data for each of Mario’s animation frames.
Vector Graphics
The second type of display is called vector graphics. Rather than the electron beam moving from left to right, top to bottom, in this method the hardware has more or less direct control over the beam. This means that given two points (a vector), the hardware can draw a line directly between the two points. Thus, vector graphics don’t conform to a specific grid. In more primitive vector displays, the shapes created will not be filled in, leading to a very unique look and feel.
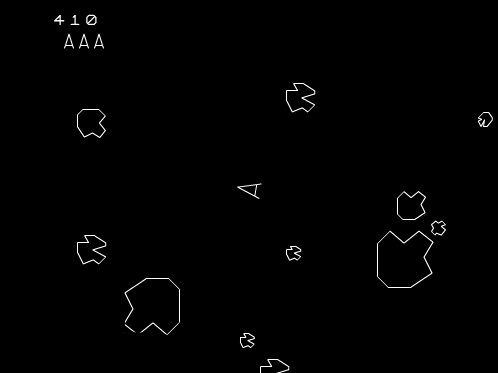
Good examples of early vector graphics include arcade classics like Asteroids and Tempest.
Here we only need to store (or calculate!) points for the electron beam to move to in order to draw the graphics.
Turtle Graphics
There’s a subset of vector graphics known as turtle graphics that was first introduced in the Logo programming language.
In this subset, a relative cursor called the “turtle” is used to plot lines to the screen. It’s easy to conceptualize what the turtle does – it can move forwards and backwards, turn, and move its pen up and down from the “paper” or display. This makes turtle graphics essentially a digital pen plotter.
Given a heading and distance, we can plot lines easily, and by changing heading, more complicated shapes can be made.
Because of its simplicity, turtle graphics are a great way to introduce young or beginner programmers to the world of computer graphics. Many high-level programming languages like Python include turtle graphics packages, making it easy to get your feet wet.
Here’s an example of drawing a shape using turtle graphics:

As you can see, turtle graphics are great for drawing symmetrical or fractal shapes.
Usage in RGBMatrixEmulator
RGBMatrixEmulator version 0.5.0 released in November 2021 with support for multiple display adapters aside from the default pygame. One of these is turtle, the Python package for rendering turtle graphics. If you want to render via turtle graphics on an RGBMatrixEmulator-powered script, you can simply add "display_adapter": "turtle" to your auto-generated emulator_config.json file.
While slow, I think its inclusion provides a neat Easter egg as well as excellent cross-platform support due to the fact that it’s included with Python itself.
That’s all for now. Thanks for reading!