
This is the conclusion to my previous posts about Mudora and randomized A Link to the Past – Reverse Engineering A Link to the Past Randomizer and I Analyzed 28k+ Randomized ALttP ROMs So You Don’t Have To.
Today I’ll be talking about writing a shortest-path solver for ALttPR in Mudora, similar to what you might find on the spoiler log for a game generated on alttpr.com.
Where We Left Off
In a previous post I talked about wanting to write a solver for A Link to the Past Randomizer. I had the idea to represent the game state as a 2-color graph with alternating colors where the first color is inventory states and the second is a list of locations. Consider a small, three-item contrived example:
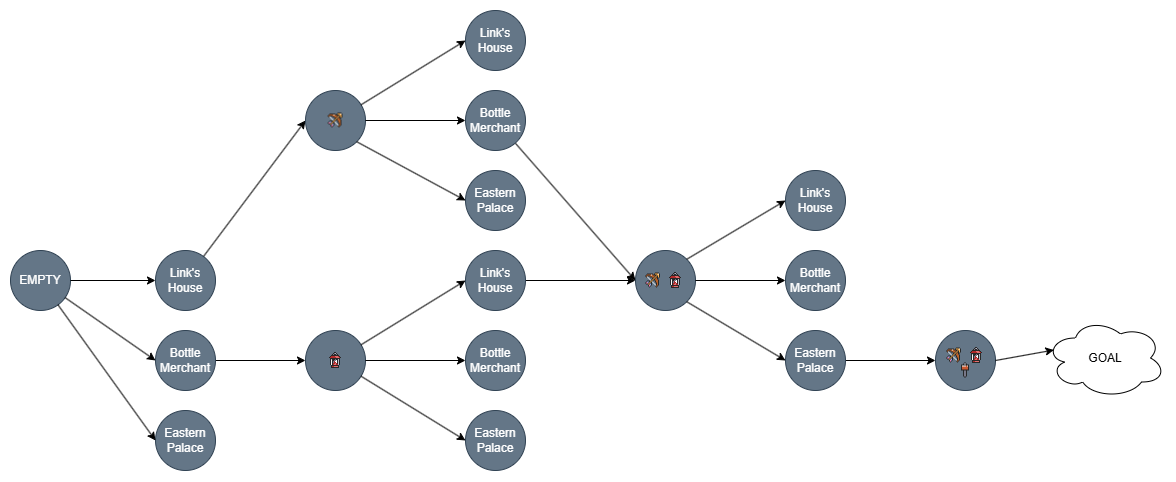
This is a bit simplified since we aren’t talking about different item placement rulesets or other types of randomization like entrance shuffle or keysanity which shuffles dungeon items, like keys.
If we had this inventory-location graph, it would be super simple to just run BFS over the graph and find the true shortest path, at least in terms of fewest checked locations. True shortest-path in terms of playtime is actually quite complicated – we’d have to model the skill of the individual and the travel time between locations (which might change depending on your inventory state). It’s totally possible that the player is able to perform glitches or sequence breaks outside the official rules. There are myriad such tricks, making it incredibly difficult to create the correct abstraction. So, we’ll settle on fewest locations checked as our definition of shortest path.
However, when I went about building this, I ran into a complexity problem, so let’s walk through it.
A Bit About ALttPR Logic
Until now I have glossed over a bit of how the logical rulesets work for ALttPR. We’ll need these in place before we can build the graph structure, since the rules factor into which nodes get edges. These rules are simply a direct port of rules found in https://github.com/sporchia/alttp_vt_randomizer, but they’re still worth talking about.
We’ll look at Hyrule Castle as an example due to its simplicity, but these rule structures apply to every location in the game.
package logic

func hyruleCastleEscapeLocationRules() map[string]Rule {
	hasLampOrAdvancedFireRod := func(items *Items, settings *Settings, regions RegionAccess) bool {
		return items.HasAtLeast("Lamp", settings.LampRequireCount) ||
			(settings.ItemPlacementAdvanced && items.Has("Fire Rod"))
	}

	secretRoom := func(items *Items, settings *Settings, regions RegionAccess) bool {
		return items.CanLiftRocks() ||
			(hasLampOrAdvancedFireRod(items, settings, regions) &&
				items.Has("Key (Hyrule Castle)") &&
				items.CanKillMostThings(settings, 5))
	}

	needsKeyH2AndCanKillMostThings := func(items *Items, settings *Settings, regions RegionAccess) bool {
		return items.Has("Key (Hyrule Castle)") && items.CanKillMostThings(settings, 5)
	}

	return map[string]Rule{
		"Sewers - Secret Room - Left":     secretRoom,
		"Sewers - Secret Room - Middle":   secretRoom,
		"Sewers - Secret Room - Right":    secretRoom,
		"Sewers - Dark Cross":             hasLampOrAdvancedFireRod,
		"Hyrule Castle - Boomerang Chest": needsKeyH2AndCanKillMostThings,
		"Hyrule Castle - Zelda's Cell":    needsKeyH2AndCanKillMostThings,
		"Sanctuary":                       alwaysAccessible,
		"Hyrule Castle - Map Chest":       alwaysAccessible,
		"Secret Passage":                  alwaysAccessible,
		"Link's Uncle":                    alwaysAccessible,
	}
}

func hyruleCastleEscapeRegionRules() map[string]Rule {
	return map[string]Rule{}
}

func hyruleCastleEscapeCompletionRules() map[string]Rule {
	return map[string]Rule{
		"Hyrule Castle Escape": alwaysAccessible,
	}
}
Firstly you’ll notice the location rules. These define rules for specific chests or places an item might be found. You can see they factor in things like items or even randomizer placement settings. For reference, the settings default back to the original ruleset, so while they’re expandable/configurable, right now item placement is always Advanced. As a concrete example here, for the three chests in Sewers Secret Room, you need either Gloves or a light source (which might be a Fire Rod in Advanced placement). Dark Cross always requires a Fire Rod. The items.CanKillMostThings setting is almost universally true in this mode, since Bombs are weapons but the rules don’t check whether you can acquire them – it assumes if you need them, in the worst case you will buy them from a shop.
Also notice the region and completion rules. These define how you are able to enter the “region”, which you can think of as a named location in the game. These might be Hyrule Castle (of course), Eastern Palace, parts of Death Mountain, or Ganon’s Tower. The region contains many locations.
Finally, the completion rules define whether the location is completable given an inventory state. This isn’t super relevant for some locations such as this one, but for dungeons it’s extremely important because it means you might be able to acquire the boss item and dungeon reward, such as a Crystal or Pendant.
With rules in place, we can move on to solving ALttPR.
The Problem
I really should have foreseen the issue with the graph approach – I neglected to analyze the complexity of my graph generation algorithm. We know the solution search using BFS is efficient at O(|V| + |E|), which is really all I was thinking about when detailing the item-location graph above. But, I failed to consider just how many inventory states are relevant to an ALttPR playthrough. It’s not just items – we have to consider keys as well!
So, let’s do a little math, just on the items you might collect in your inventory. It’s not even important to consider keys at this point, the problem becomes apparent even without it. Luckily, we can discard consumables like bombs and arrows.
23 binary items (either you have it or you don't, like Hookshot, Mirror, Hammer, Moon Pearl, etc.)
5 progressive items (Sword, Bow, Glove, Shield, Mail) -- we must consider every level + the default (usually None, but Green in the case of mail)
Then our key-less inventory state space is given by:
(2 ^ 23) x 5 swords x 3 mails x 3 gloves x 3 bows x 4 shields
Which is a whopping 4.5 billion states. And remember, that’s not including keys or dungeon rewards like Crystals or Pendants – all of those matter, too! The crux of the issue becomes: every item we need to consider at least doubles the inventory state space.
To make matters worse, in my original graph each inventory state node has an edge between a unique copy of every location node, so we’d effectively multiply 4.5 billion (or more) by around 278 locations. Admittedly we could trim that down to only creating a new location node if the location is reachable and has not already been collected, but I consider that a micro-optimization and the point still stands that the inventory state space is too large from the start.
The Solution
For the solution we’re going to continue using a modified BFS algorithm, but instead of considering all possible paths separately, we’ll compress them into a smaller inventory state space. We’ll do that by setting our next inventory state to include all reachable items. So, we’ll start with an EMPTY inventory state, then the frontier will be all reachable locations from that inventory state. We’ll disregard anything that isn’t a progression item, and collect everything else that is. With that new state, we can consider the next frontier, and so on.
The nice thing about this is that each frontier is a fixed size, at most 278 locations. And since the inventory is monotonically increasing in size after each frontier (as long as the game is able to be beaten), we know we must collect at least one item at each step. That gives us worst case 2782 or 77,284 iterations over locations, roughly 9 orders of magnitude smaller than the original naive approach. Notice as well that since our runtime is not determined by the number of items in the inventory, we can consider every possible item at no cost, including keys and dungeon rewards!
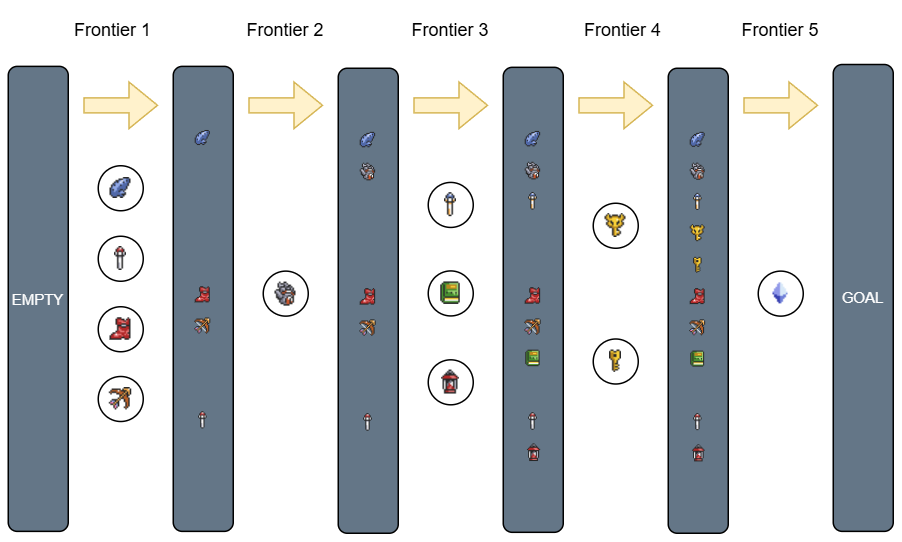
Once we have an inventory state that satisfies all goal state rules, we can stop, since we know the shortest-path inventory state must be a subset of the current inventory state, although we’re not able to determine it yet.
The Tradeoffs
There is a downside – we don’t know the true shortest path with this approach. We can apply a heuristic by culling out any inventory items that aren’t actually required. The BFS inventory compression algorithm first finds the maximum inventory at the moment we reach the goal state. We then iterate every item, tentatively remove it, and check if removing this item makes the game uncompletable. If it does, we re-add that item to our inventory. If not, we carry on without that item. This gives a small, but not necessarily minimal, inventory state for which the game is still completable.
I think this is fine. If you look at https://github.com/sporchia/alttp_vt_randomizer this is a similar methodology they use to generate a playthrough. Like I mentioned before, this is an incomplete abstraction anyway since it doesn’t account for how fast players actually play the game. It might also send you to really distant locations or avoid an item that can make you go faster (perhaps literally faster, like Pegasus Boots, which aren’t always required). It also skips anything that isn’t strictly necessary, like sword upgrades or health. These upgrades offer real time savings, but may not be required by the logical ruleset the randomizer employs.
Long story short, if you can beat the game following only locations in one of these playthroughs – kudos to you. You’re better than I am at Zelda.
That’s all for now. Thanks for reading!