
Other Posts in This Series
- Introduction
- Graphics (You’re here!)
- Physics
- Collision Detection
- Computer AI
- Screen Transitions
- Postmortem
Before We Get Started
I should mention that Pocket League is written in C using the Gameboy Development Kit 2020. It’s tested on PC using BGB, but it also runs on a real Gameboy.
For the purposes of this blog, all the code was compiled with the help of GBDK and ran on BGB. I’ll bring up other tools as their knowledge is required.
Graphics on the Gameboy
Today I’d like to talk a bit about how the graphics for Pocket League work. More specifically, how sprites work, as they’re ultimately more interesting than how I made the backgrounds for the game.
Gameboy Background Info
- A Gameboy’s display is 160 (width) x 144 (height) pixels.
- Graphics are stored in 8x8 tiles, which can then be assigned to a sprite.
- Only when a sprite is assigned a tile and the sprite is moved to a coordinate position on the screen is it displayed.
- Up to 40 sprites can be on screen at the same time.
- The Gameboy can perform simple transformations for sprites, such as flipping it along the X or Y axis (or both), change the palette, or move it from foreground to background.
I’m sure that was word salad, so lets open up BGB and look at the VRAM (video memory). If you’re playing along at home on BGB, you can right lick the game, then go to Other -> VRAM Viewer.
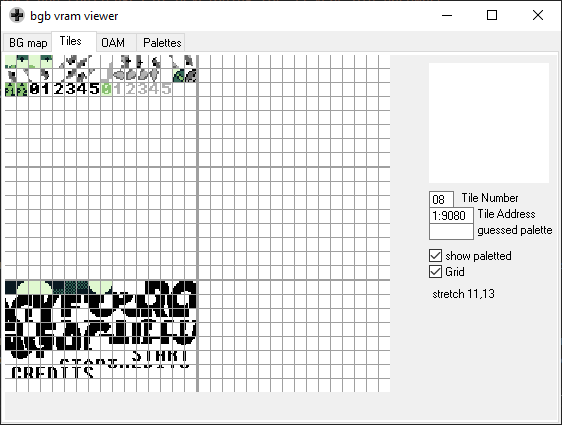
Whoa! Let’s ignore the bottom left quadrant – those are the background sprites, and we can talk about that in a bit. The top left quadrant is sprite data. Still – that looks pretty garbled. But why?
Pocket League’s Sprites
Well, as some have already guessed, the sprites for almost everything in Pocket League are larger than 8x8 pixels! They’re actually 4 sprites each, so 16x16 pixels. Here’s an example of the Player 1 car:

If you look closely, the first four sprites in VRAM correspond to the Player 1 car. The ball is exactly the same. In fact, the only sprites that aren’t represented by an array of four 8x8 sprites are the score numbers, the boost, and the player arrows.
Together, this means that when we need to move a car in Pocket League, we actually have to move FOUR car sprites (five if you count the boost trail, but we’ll get to that). Here’s how Pocket League draws cars to the screen:
First, we have to initialize all the tile data for the car. This data is generated by the Gameboy Tile Designer, which doesn’t look like much but lets me draw sprites and spit out the data inside a big array of hex values:
// Yes, this is a car. Can't you tell?
unsigned char car[] =
{
  0x00,0x00,0x00,0x00,0x00,0x00,0x00,0x00,
  0x00,0x00,0x00,0x00,0x06,0xC9,0x0E,0xD1,
  0x80,0xFF,0x90,0xFF,0x38,0xFF,0x10,0x10,
  0x00,0x00,0x00,0x00,0x00,0x00,0x00,0x00,
  0x00,0x00,0x00,0x00,0x00,0x00,0x00,0x00,
  0x00,0x00,0x00,0x00,0xE0,0x00,0xF0,0x00,
  0x01,0xFE,0x09,0xFE,0x1C,0xFF,0x08,0x08,
  0x00,0x00,0x00,0x00,0x00,0x00,0x00,0x00,
  // There's more data here, but anything past this is how the car is rotated. We'll get there.
};
Next, actually put the data into GB memory:
// initialize_cars() accepts a param (n) to know whether it's dealing with Car 1 or Car 2
// Here, that logic has just been truncated to SECOND_CAR to avoid confusion
void initialize_cars(INT8 n) {
  // Load the data from above into VRAM
  set_sprite_data(0, 24, car);

  // Set some other stuff, like player tags and boost

  // Loop through the sprites 0, 3 (4 total)
  for(INT8 i = 0; i < 4; i++) {

    // Set the sprite's tile to what's in GB VRAM
    set_sprite_tile(i, i);

    // If it's the second car, flip it horizontally!
    if (SECOND_CAR) {
      // Set the sprite property to flip
      set_sprite_prop(i, S_FLIPX);
    }
  }
}
And finally, move it around!
void move_car_sprite(UINT8 n, UINT8 x, UINT8 y, UINT8 rot) {
  INT8 spr_offset = n * 5;

  move_sprite(0 + spr_offset, x,     y    );
  move_sprite(1 + spr_offset, x,     y + 8);
  move_sprite(2 + spr_offset, x + 8, y    );
  move_sprite(3 + spr_offset, x + 8, y + 8);

  // Code to draw the boost sprite omitted here

  draw_car_roll(n, rot);
}
To sum it up:
- Load data into VRAM with
set_sprite_data - Load the tile data from VRAM into the sprite
set_sprite_tile - In this case, apply a sprite property with
set_sprite_prop. These can happen at any time, however, even before loading the tile data. - Move the sprite onto the screen with
move_sprite
Once all this is done, we can refer to a sprite by its index (40 max, so possible indices are 0 to 39). Player 1’s car is sprite 0 to 4, for instance.
In the move_car_sprite function you’ll notice there’s a spr_offset which corresponds to the number of sprites that each car takes up (4 main sprites + 1 boost trail sprite). In theory this function supports an arbitrary number of cars, but in reality it’s not practical to have more than two.
But What About Rotating 16x16 Sprites?
You may be asking at this point how the car flips over, especially if you paid attention to that extra rot param in move_car_sprite. A little example of what I’m talking about:

If we know that each one of those frames is comprised of four sprites, how did it get accomplished? Let’s break that GIF out into a spritesheet so we can see what we’re looking at.
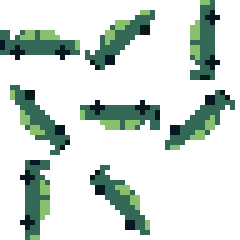
The astute observer will note that there are 8 sprites here, and 8 sprites x 4 tiles per sprite = 32 tiles total. If you look back at the BGB VRAM screenshot above (or the call to set_sprite_data(0, 24, car)), you will notice that in reality, there are only 24 tiles of graphics data loaded.
S_FLIPX, S_FLIPY, rot, and ROTATION_SPEED Make My Head Car Spin
We’ve looked at the S_FLIPX sprite property above to flip the sprite horizontally for the entire car, but we can also do the same for the Y value using S_FLIPY. Some of the sprites in the sheet above were able to be culled because the sprite was simply a mirror image of another in either the X or Y axis.
Also, notice that since the car is rotating, each corner sprite of the car won’t correspond to the same part of the car as it rotates. For instance, considering Player 1’s car facing right, the sprites starting top right and moving clockwise are the windshield, front wheel, back wheel, and back windshield, whereas if the car is upside-down, the top right sprite is the back wheel. This means sprites will be assigned different tiles based on where it is in the rotation cycle, and so we can’t count on a useful constant offset like we did above for initializing the cars.
The first thing you should know about rotation is that Pocket League uses an 8 bit integer which can only have values of 0 to 255 to store the rotation value for the car. This seems weird until you consider that 256 is evenly divisible by 8 (the total number of rotation sprites we have).
During the game loop, holding left (or right) while in the air increments (or decrements) the rot value by the game’s ROTATION_SPEED (which I have discovered in writing this that I infuriatingly set to 15 instead of something sane like 16, which 256 is evenly divisible by). Let’s revisit the draw_car_roll function we saw in the move_car_sprite function with this new knowledge. Notice it takes rot as a parameter.
/* Rolls the car clockwise based on *rot* param (INT8 0 - 255) */
void draw_car_roll(INT8 n, UINT8 rot) {
  UINT8 quadrant = rotation_quadrant(rot);

  UINT8 invert_x = 0;
  UINT8 invert_y = 0;
  unsigned char sprites[];

  if (quadrant == 0) // Car hood up, facing right
  {
    if (n == 0) {
      unsigned char sprites[] = { 0, 1, 2, 3 };
    } else
    {
      unsigned char sprites[] = { 2, 3, 0, 1 };
      invert_x = 1;
    }
  }
  else if (quadrant ==  1) // Car hood up, facing downward right
  {
    if (n == 0) {
      unsigned char sprites[] = { 12, 13, 14, 15 };
    } else {
      unsigned char sprites[] = { 6, 7, 4, 5 };
      invert_x = 1;
    }
  }

  /*
  There is FAR more code here, one for each quadrant (up to index 7, quadrant #8)
  I leave it as an exercise to the reader if you want to see EVERY sprite value
  */

  for (INT8 i = 0; i < 4; i++) {
    set_sprite_tile(i + (5 * n), sprites[i]);

    if (invert_y) {
      set_sprite_prop(i + (5 * n), get_sprite_prop(i + (5 * n)) | S_FLIPY);
    } else {
      set_sprite_prop(i + (5 * n), get_sprite_prop(i + (5 * n)) & ~S_FLIPY);
    }

    if (invert_x) {
      set_sprite_prop(i + (5 * n), get_sprite_prop(i + (5 * n)) | S_FLIPX);
    } else {
      set_sprite_prop(i + (5 * n), get_sprite_prop(i + (5 * n)) & ~S_FLIPX);
    }
  }
}
Rotation Code Breakdown
This is understandably a DAUNTING wall of code. Let’s step through it.
  // This is simply rot / 32, which returns an integer value from 0 to 7.
  UINT8 quadrant = rotation_quadrant(rot);

  // These are flags to determine whether to flip the sprite's X or Y value (or both)
  UINT8 invert_x = 0;
  UINT8 invert_y = 0;
  // This holds the sprites. Each car has 4, so it will be filled with 4 values.
  unsigned char sprites[];
So we’re just allocating what we need, then updating them later. We need the quadrant the car is in, whether the sprites should be flipped, and what the sprite tiles are. Next, based on the quadrant, we’ll assign things:
  if (quadrant == 0) // Car hood up, facing right
  {
    /*
    We check if n == 0, which corresponds to Car #1. Otherwise, it's Car #2

    The two cars sometimes use the same sprites, but they'll be in different orders

    The S_FLIPX and S_FLIPY only flip the TILES, not the position of the actual sprites
    */
    if (n == 0) {
      unsigned char sprites[] = { 0, 1, 2, 3 }; // Notice this uses the same sprites as below
    } else
    {
      unsigned char sprites[] = { 2, 3, 0, 1 }; // But they're not in the same order!
      invert_x = 1;
    }
  }
And finally assign the tiles and properties. There’s some weird offsetting here to make sure that the sprites correspond to the correct car.
  /*
  This code simply iterates through the sprites, sets the sprite's tile, and assigns the correct X or Y flip value

  NOTE: get_sprite_prop allows us to preserve the sprites existing properties and only set the properties we want.
  */
  for (INT8 i = 0; i < 4; i++) {
    set_sprite_tile(i + (5 * n), sprites[i]);

    if (invert_y) {
      set_sprite_prop(i + (5 * n), get_sprite_prop(i + (5 * n)) | S_FLIPY);
    } else {
      set_sprite_prop(i + (5 * n), get_sprite_prop(i + (5 * n)) & ~S_FLIPY);
    }

    if (invert_x) {
      set_sprite_prop(i + (5 * n), get_sprite_prop(i + (5 * n)) | S_FLIPX);
    } else {
      set_sprite_prop(i + (5 * n), get_sprite_prop(i + (5 * n)) & ~S_FLIPX);
    }
  }
Boost, Ball, and Other Graphics
I’ll keep it simple here as there is much less going on with the other graphics:
- Ball graphics are 16x16 as well
- They only have 2 tiles (to simulate rotation). Each tile in the sprite is the same, but rotated to make a “ball”.
- They are moved just like in the
move_car_spritefunction, but take an additionaltickparameter based on the game’s current tick count. If it’s odd, then sprite is swapped to the second tile, which is simply drawn with a faux 45 degree offset.
- Boost graphics are 8x8 sprites
- They also have 2 tiles (to simulate flowing flames). It has 3 rotations, but can be flipped to get a full 8 degrees of rotation.
- It has its own
draw_boost_spritefunction that is called when a player presses B. - The function accepts a
rotparam, but it’s actually the inverse of themove_car_spritefunction since it must be drawn from the BACK of the car.
- Player tags are 8x8 and are drawn under the car via the
move_car_spritefunction - The countdown and score numbers each have their own 8x8 sprites, but the implementation is simple.
All of the above should be visible in the VRAM screenshot above.
Backgrounds
Honestly, backgrounds were an afterthought in this game. I was able to essentially open a graphics editor (MS Paint worked just fine), and the drop a 160x144 bitmap into Gameboy Tile Data Generator (gbtdg) to have it spit out the tilemap. Load it into my code and et voila, what you see is what you get.
The hardest part was shamelessly ripping off lovingly editing the Rocket League logo to match the title.
Final Words
Whew. We made it. I hope you’ve enjoyed this deep dive on the graphics of Pocket League. This was one of my favorite parts of coding the game and I think it turned out really well and captured the essence of the main game. There’s room for cleanup, but if it ain’t broke, don’t fix it.
Thanks for reading!
- ← Previous: Writing a Gameboy Game in 2021: Part 0 -- Introduction
- Next: Writing a Gameboy Game in 2021: Part 2 -- Physics →