
Other Posts in This Series
- Introduction
- Graphics
- Physics
- Collision Detection (You’re here!)
- Computer AI
- Screen Transitions
- Postmortem
Did You Just Hit Me?
In Part 2, I showed how Pocket League simulates car and ball physics. The cars are now able to drive around left and right, jump, air roll, and boost. The car and the ball are both affected by gravity, and the ball can bounce off the walls, ceiling, and floors of the simple arena in the game.
But, without collision detection implemented, cars can’t interact with the ball, so… Nothing really happens. Womp, womp.
In this entry, we’ll talk a bit about how (poorly) Pocket League’s original collision detection worked and how it was refactored in Version 0.1.0+.
Getting Feedback on v0.0.1
When I originally released Pocket League, I posted it on /r/RocketLeague for some fan feedback. I expected some good and bad.
This comment was equally hilarious and helpful:
hitboxes are completely clapped but very cool
- /u/AENAT0R
First of all, this cracked me up. And second of all, AENAT0R was completely right. Looking back on the GIF from the release, you can actually see the ball clip through cars a few times.

Clearly, collisions in 0.0.1 were more of an approximation than a rule.
How Can We Fix It?
First, let’s take a look at the collision check code from the original release:
  if ((x <= ball_x + 16 && x >= ball_x - 16) && (y <= ball_y + 11 && y >= ball_y - 5)) {
    return 1; // Collision
  }
Yikes. This is bad. If you’ve worked with hitboxes before, this should look familiar, but apparently I thought it was a good idea to throw in some magic numbers. And as with any magic numbers, not even I know what they do anymore.
We can try to break it down, though. Looks like this code tries to check if the car overlaps the ball in the X axis. Seems okay, given that the car and ball are 16 pixels wide. Makes sense to me.
(x <= ball_x + 16 && x >= ball_x - 16)
And looks like this code checks… That the car overlaps the ball on the Y axis, but not exactly? Who knows what I was thinking.
(y <= ball_y + 11 && y >= ball_y - 5)
And of course the result is the broken collision detection. It’s clear this needed a heavy rework. To do so, we need to consider the following:
- Hitboxes for the car should match the width and height of the car graphics.
- Hitboxes for the ball should match the width and height of the ball graphics.
- Car hitboxes should CHANGE based on the rotation of the car.
- Ball hitboxes should NOT CHANGE as the ball does not rotate (it’s graphics simulate this, but its dimensions are constant).
How 2D Hitboxes Work
Pocket League’s hitboxes are technically AABBs or Axis-Aligned Bounding Boxes. They’re axis-aligned because the boxes are fixed to the X and Y axis and can’t rotate (so no diagonal lines). They’re not super precise, but they’re very easy to calculate overlaps, which are collisions in our game engine.
You can define an AABB with two points (x1, y1) and (x2, y2). That means the vertices of the box are as follows:
(x1, y1)(x2, y1)(x1, y2)(x2, y2)
And we can detect a collision between two hitboxes quite easily (pseudocode for simplicity):
box1 = Box(x1, y1, x2, y2)
box2 = Box(x3, y3, x4, y4)

# Overlap on the X axis:
if box1.maxX >= box2.minX and box1.minX <= box2.maxX:
  # Overlap on the Y axis:
  if box1.maxY >= box2.minY and box1.minY <= box2.maxY:
    return COLLISION
The calculations above approximate the following:
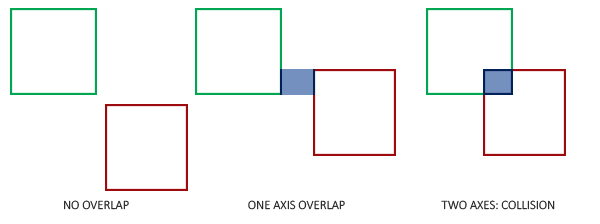
Rotating Hitboxes in Pocket League 0.1.0
Going back to our 4 goals for Pocket League hitboxes, clearly the car is the more complicated issue. The hitboxes will need to change based on the rot param (much like we’ve covered in other parts). Before we get there, lets dig into a couple easy cases.
If the car is horizontal or vertical, we can draw a single rectangle around the car that bounds it pretty well. I decided to omit the wheels from the car just to make the hitbox as tight as possible. Here’s what it looks like in Pocket League (if you could see them):

Notice that we can re-use hitboxes even if the sprite is flipped. We can do the same thing with vertical hitboxes:

But look what happens when we try to apply an AABB hitbox to a car that’s at 45 degrees:
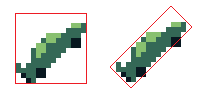
Uh-oh! The image on the left is technically the width and height of the car sprite, but if you were to use this hitbox, the the ball would bounce off all the whitespace on the top left and the bottom right!
And the image on the right is a plausible solution, but it’s not an AABB, because the box is rotated. So we can’t use it!
Multiple AABB Hitboxes Per Sprite
Enter the solution: multiple hitboxes per car. We can draw many smaller hitboxes to get a closer approximation of the car. In theory, we can draw these down the pixel level and check on a pixel-by-pixel basis whether the car’s sprite is within the ball’s, but obviously that’s overkill.
Pocket League’s actual hitboxes on cars rotated 45 degrees look something like this. These are mockups, but you should get the idea:
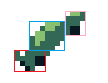
It’s not perfect, but at 30fps or whatever Pocket League runs at and a Gameboy’s 1 MHz processor crunching the physics multiple times per second, it’s close enough.
Calculating Hitboxes
Finally, we’re here! Let’s look at some Pocket League code where we figure out the car’s hitbox given its position and rotation:
UINT8 * calculate_car_hitbox(UINT8 x, UINT8 y, UINT8 rot) {
  UINT8 quadrant = rotation_quadrant(rot);
  UINT8 hitbox[12] = {
    255, 255, 255, 255,
    255, 255, 255, 255,
    255, 255, 255, 255
  };

  if (quadrant == 0 || quadrant == 4) {
    hitbox[0] = x;
    hitbox[1] = x + 15;
    hitbox[2] = y + 6;
    hitbox[3] = y + 10;
  }
  else if (quadrant == 1 || quadrant == 5) {
    hitbox[0] = x + 2;
    hitbox[1] = x + 8;
    hitbox[2] = y + 1;
    hitbox[3] = y + 7;

    hitbox[4] = x + 5;
    hitbox[5] = x + 11;
    hitbox[6] = y + 4;
    hitbox[7] = y + 11;

    hitbox[8] = x + 8;
    hitbox[9] = x + 13;
    hitbox[10] = y + 10;
    hitbox[11] = y + 14;
  }
  else if (quadrant == 3 || quadrant == 7) {
    hitbox[0] = x + 8;
    hitbox[1] = x + 14;
    hitbox[2] = y + 2;
    hitbox[3] = y + 6;

    hitbox[4] = x + 4;
    hitbox[5] = x + 11;
    hitbox[6] = y + 4;
    hitbox[7] = y + 11;

    hitbox[8] = x + 1;
    hitbox[9] = x + 6;
    hitbox[10] = y + 10;
    hitbox[11] = y + 13;
  }
  else if (quadrant == 2 || quadrant == 6) {
    hitbox[0] = x + 6;
    hitbox[1] = x + 10;
    hitbox[2] = y;
    hitbox[3] = y + 15;
  }

  return hitbox;
}
First, we figure the car’s rotation segment, and then we allocate a 12 integer wide array of numbers called hitbox. Each 4 integer slice is an AABB hitbox in the shape of { x1, x2, y1, y2 }. I should have made it { x1, y1, x2, y2 }, but it works, so I’m not changing it.
  UINT8 quadrant = rotation_quadrant(rot);
  UINT8 hitbox[12] = {
    255, 255, 255, 255,
    255, 255, 255, 255,
    255, 255, 255, 255
  };
And the next section of code simply assigns the correct points;
  if (quadrant == 0 || quadrant == 4) {
    hitbox[0] = x;
    hitbox[1] = x + 15;
    hitbox[2] = y + 6;
    hitbox[3] = y + 10;
  }
  else if (quadrant == 1 || quadrant == 5) {
    hitbox[0] = x + 2;
    hitbox[1] = x + 8;
    hitbox[2] = y + 1;
    hitbox[3] = y + 7;

    hitbox[4] = x + 5;
    hitbox[5] = x + 11;
    hitbox[6] = y + 4;
    hitbox[7] = y + 11;

    hitbox[8] = x + 8;
    hitbox[9] = x + 13;
    hitbox[10] = y + 10;
    hitbox[11] = y + 14;
  }

  // And so on
Notice some of the rotation segments only have 4 values – That’s where the car is vertical or horizontal, so we only need 1 hitbox instead of 3! This makes crunching through collision detection in those cases a little easier.
Calculating Collisions
Now that we have the hitboxes, we can calculate whether a collision occurred with the detect_collision function:
UINT8 detect_collision(UINT8 x, UINT8 y, UINT8 rot, UINT8 ball_x, UINT8 ball_y) {
  UINT8 *car_hitbox;

  // Car hitbox code from above
  car_hitbox = calculate_car_hitbox(x, y, rot);
  UINT8 ball_x1;
  UINT8 ball_x2;
  UINT8 ball_y1;
  UINT8 ball_y2;

  // Similar function to calculate_car_hitbox, but for the ball. It's simpler since the ball hitbox is constant.
  calculate_ball_hitbox(ball_x, ball_y, &ball_x1, &ball_y1, &ball_x2, &ball_y2);

  // Iterate through a maximum of 3 hitboxes
  for (INT8 i = 0; i < 3; i++) {

    // Blank hitbox, still set to the default of 255 from calculate_car_hitbox
    if (car_hitbox[4 * i] == 255) {

      // Skip it!
      continue;
    }

    // This code is functionally equivalent to the pseudocode for collision above
    if (car_hitbox[4 * i + 1] >= ball_x1 && car_hitbox[4 * i] <= ball_x2) {
      if (car_hitbox[4 * i + 3] >= ball_y1 && car_hitbox[4 * i + 2] <= ball_y2) {
        return 1; // COLLISION!
      }
    }
  }

  return 0; // Default to FALSE
}
Affecting the Ball
There’s just one last piece. Now that we know whether the ball is hit or not, we can return to the calculate_ball_velocity / tick_ball_physics functions I talked about in Part 2 and give the ball some acceleration:
UINT8 calculate_ball_velocity_vectors(UINT8 x, UINT8 y, INT8 d_x, INT8 d_y, UINT8 rot, UINT8 ball_x, UINT8 ball_y, INT8 *ball_d_x, INT8 *ball_d_y) {
  UINT8 collision = detect_collision(x, y, rot, ball_x, ball_y);

  if (collision) {
    // Multiply the car X velocity by a scaling factor
    *ball_d_x = d_x * BALL_VELOCITY;

    // Subtract a small scaling factor from the car Y velocity (this gives slight preference to fly upwards, much like real Rocket League)
    *ball_d_y = d_y - (BALL_BUMP_VERT * abs(d_x) / 10);
  }

  return collision;
}
And that’s it! In essence, all we’re doing is calculating a hitbox, checking if it intersects with the ball, and, after some scaling, adding the velocity from the car to the ball.
I think that tackled all the goals we set out to achieve:
- Hitboxes for the car should match the width and height of the car graphics.
- Hitboxes for the ball should match the width and height of the ball graphics.
- Car hitboxes should CHANGE based on the rotation of the car.
- Ball hitboxes should NOT CHANGE as the ball does not rotate (it’s graphics simulate this, but its dimensions are constant).
If you’re interested in seeing the car hitboxes in game, there’s a debug flag called HITBOXES_ENABLED. Setting this flag to 1 will enable Car 1 and ball hitboxes to appear in game. They’re pretty primitive (they simply draw a point at the vertices of each hitbox) and might be buggy, so I can’t guarantee they will always work going forward. Still, it’s sort of interesting to see how they would appear on screen.
Next Time
In the next part, now that we have all the graphics, physics, and collision detection in place, it’s time to talk about AI! We’ll dive into how the player interacts with the game to start, and then we’ll check out how the computer utilizes a surprisingly similar method to move around.
Thanks for reading!
- ← Previous: Writing a Gameboy Game in 2021: Part 2 -- Physics
- Next: Writing a Gameboy Game in 2021: Part 4 -- Computer AI →